Tuesday, June 30, 2009

Napkin Rings

It's Becky with you today and I have a couple of things to say. First off, I didn't get any organizing done Saturday. :( I got down to my scraproom and realized, I don't have room for my new shelves. What's a girl to do when she doesn't have room for new shelves? The same thing a girl does when she's finds a great pair of shoes on sale that don't match anything she owns. She buys a new outfit to match the shoes, right? Since my shelves don't fit, I have to make room for them which means, I have to re-arrange my room and buy a new scrap table. If you know me at all, you know I love to change things around. Even if they're perfectly fine the way they are! :) Mike and I will be working on the new table over the next two months and when it's done, then, hopefully, I'll post pictures! :) Second of all, after reading Saturday's post I realized I say "so" way too much! Thirdly, I'm super excited for tonight. After dinner, I'm heading over to Stacy's to craft the night away! Finally, today's project!

In May, when PTI came out with the Let Freedom Ring set, I knew I had to have it. Largely in part to Lisa Johnson's post here. I loved the napkin rings she made and thought they would be a really easy way to add some patriotic flare to our bash! I stamped each of the round images from the set onto white card stock, punched them out with my 1 1/2 inch circle punch and adhered them onto pinked circles from my Accent Essentials cartridge for my Cricut. Then I cut a piece of patterned paper to 1" by 4" and stuck my circle embellishments to the middle. Finally I wrapped the whole piece around my rolled plasticware!

Here's a close up of the napkin rings and you can see the patterned paper here. It looked like an old faded red and white checkered table cloth. In the center of the stamped image, I adhered a rustic wood button from PTI.


I hope you have a great night! I know Stacy and I will!

Monday, June 29, 2009

CHF Challenge #1

Hey gang !! Stacy here.....well the CHF summer challenge is underway !! I was really excited to submit this card.....I think that it absolutely reflects who I am as a crafter. The colors turned out beautiful and I hope you enjoy !!


Saturday, June 27, 2009

Fourth of July Goodie Bags

Well here we are, Saturday again! It's Becky with you today and I am super excited! We were at the pool this morning and our neighbors were having a garage sale. So while I was swimming, I spyed a set of shelves that would be perfect for my scrapbook room. So I walked on over there, in my swimsuit and towel, and was able to get them for $25! So, I'm going to spend the afternoon re-organizing all my treasures! I'll try and share a picture when I'm done! Okay, on to my project for today! I have more Fourth of July goodness to share!

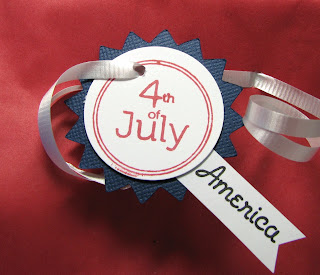
I made up goodie bags for Landry's birthday party next Saturday and just purchased the blue and red sandwich bags from Wal-Mart. I think they're 4 for a $1. Then I used my Let Freedom Ring set and Palette inks and stamped on some PTI white card stock. I used by 1 1/2 inch circle punch and punched them out and mounted them on that cool pinked circle. The pinked circle came from my Accent Essentials cartridge for my Cricut. I thought it looked more Fourth of Julyish than a scalloped circle, don't you! Then I stamped "America" from the same set and trimmed it up to look like a little flag and attached it under the circle.

Here's a close up of the tag. I just punched a small hole with my Crop-a-Dile and threaded it onto the white curly ribbon which hold the bag closed.
Okay then, have a great weekend. I'm off to organize!


Friday, June 26, 2009

Feel Better

Happy Friday gals ! Stacy here tonight with a card I put together for my husband's grandma that is feeling a little under the weather. I started with a 6x6 piece of cardstock, added a brown piece of cardstock to the bottom and I rounded the corners (sorry...didn't get that in the pic !!). The patterned paper is DCWV and was a 12x12 piece that had this design in the bottom right corner. I cropped it down and mounted on coordinating red cardstock. I finished it off with brown ribbon and three buttons that tie it all together. Sentiment is PTI stamped in brown. Hope you enjoy and have a great weekend !!


Thursday, June 25, 2009

Patriotic Pinwheels

Happy Thursday friends! It's Becky with you on this fine day. I tell ya, it must be pinwheel week on the bloggy blog! Today's project is one I got from here. When I read Lisa's post about gluing the pinwheels to clothespins, I thought she was a genius. I'm always looking for more decorating ideas for The Fourth and I thought these would be great to clip on various things around the house. So I made a bunch of these Patriotic Pinwheels and clipped them to the blinds in our half bath, downstairs. I feel like the half bath is neglected, not quite a full bath so people often write it off! So whenever I get the chance, I like to add a little something to that room! I made the pinwheels in several different sizes.

Start by cutting your paper in a square, such as 8x8 and draw a pencil line from corner to corner so they intersect in the middle of your paper. Then with your scissors, cut the four corners, towards the middle, stopping about an inch before you get to the center. Then poke a hole in every other corner and in the middle. Using a brad, attach all the holes to the center and secure. I attached all of my pinwheels to the clothespins with Zip Dry, one of my new favorite adhesives.
Here's a close up picture of one of the pinwheels. I think this one started as a 4x4 piece of paper.


Wednesday, June 24, 2009

Celebration Buckets

Stacy here this stormy Wednesday night !! I'm trying to post quickly because a nasty storm is headed our way....3 days this week now and we've have some crazy weather !! I have to start by telling you that my original post tonight was going to be a USA banner. Ok, that didn't happen !! After I saw Becky's, I was too embarrassed to post mine !! lol She did what any BFF would do and told me it would be just fine (I told her it was ok to laugh !!) So, I decided to make a few decorative buckets to throw around the table for firecracker day. I bought the buckets last Halloween at Target...$1 for 2 !!! They are approximately 3-4 inches tall. I lined the middle with My Mind's Eye "It's Time to Break Free" paper (which I love) and tied a felt star with "Celebrate" on the tag to ribbon. The pinwheels are made from the same paper, secured with brads and a button and I used candy sticks that I bought at Hobby Lobby for the stems.

Here's a little better shot:
Well, the thunder is getting closer so I'll let ya go for now. Have a great night !!


Tuesday, June 23, 2009

USA Banner

Hi there, it's Becky with you today. Just when I think it can't get any hotter, it does! Temperatures were in the upper 90's today and we had a heat index of 110! Today's project is a USA banner I made for our front door. I used the Learning Curve cartridge for my Cricut to make the stars and my Storybook cartridge for the letters. I used Melissa Frances papers and PTI Stamps. To finish it off, I made two small pinwheels and adhered them to clothespins which I slipped on to the stars. I hope it's cooler where you are!
Here's an up close shot of the U...

and the S...


and finally the A.


Sunday, June 21, 2009

Firecracker !!

Stacy here : ) It's Monday and time to get out all of that fun 4th of July stuff !! Lots of projects to post for the next few weeks so tune in daily for cute stuff !!


I've been waiting to make a firecracker and think it turned out awesome !! I took a piece of white paper 2x6 and stamped on it with just a blue and red stamp pad. I adhered twine to one end and rolled it as tight as I could and secured with glue dots. The blue paper I patterned myself with a star stamp from Hero Arts and white ink. The red and white paper were run through the Cuttlebug with swiss dots and there she is !! Card measures 7x4 1/2 complete. Have a great week.....


Saturday, June 20, 2009

Home

Well, here we are. Saturday again! Becky here today with a card to share that I made for our new neighbors. The card measures 5x5 and I trimmed piece of Kraft card stock to 4 3/4 x 4 3/4 to mat on top of the base. Then I trimmed a piece of patterned paper to 2 x 4 3/4 and adhered on top of the Kraft. I then cut out the little birdhouse with my Cricut using the Stretch Your Imagination cartridge. After that I printed out the word HOME on my computer and taped it to the birdhouse. I poked holes through the card stock and stitched the word using a running stitch. I put some pop dots on the back of my birdhouse, adhered it, added some Autumn Leaves buttons and I was done! Hope you're having a great weekend wherever you may be!


Friday, June 19, 2009

Hi : )

Stacy here : ) Well, it's 10:00 pm Friday night and I can't believe that I'm still awake !! It's been a long week and I'm glad it's over !! So my card----Becky and I are so excited about Flower Soft !! Isn't it just the coolest thing !! I used the Summer color Flower Soft on the stems for this card. I'm addicted now and I'm probably going to use it all this weekend !! lol

Have a great weekend !! See ya Monday


Thursday, June 18, 2009

Banner Birthday Card

Becky here today and it is HOT! We have a thermometer on our front porch, which is in the shade, and it say 91. It's really humid though so it feels like it's about 100-105! Today's card is of the birthday variety. I used a ruler to create four triangles on some scrap Crate Paper I had and then adhered them to some Making Memories black floss. Then I embellished the banner with some bits of ribbon, Rustic Wood Buttons from PTI and even a tiny paper photo turn. I adhered the whole banner to my Kraft card stock, stamped my Mixed Messages from PTI sentiment and then attached it to my white card base. This card is bigger than I normally make, 5 3/4 by 6 3/4.
Here's a side view of the card:

and the inside view:

I simply adhered a strip of Crate Paper with some more Rustic Wood Buttons and PTI twine and then stamped my sentiment, from PTI's Life set. Enjoy you're evening!


Wednesday, June 17, 2009

Traveling Dad

Stacy here !! Guess what !! It's Father's Day week for me......can ya guess what I've posted tonight ? lol This cutesy card is for my father. My parents love to travel in their RV (Theirs is a little bigger) and what would be more perfect than an RV card. I had a lot of fun making this one !! I think he'll love it !! Have a great night !


Tuesday, June 16, 2009

Fourth of July Banner

Hello there, it's Becky with you today. Chances are, if you're visiting you might notice that we're a little under construction. It's a bit of a long story but the all mighty Stacy is going to spruce up the bloggy blog! Tonight's post is a banner I made for Landry's birthday party last year, but I'll use it every year. I was at Gordman's and found this fabric banner with six triangles. It was too perfect to pass up especially for $3.99! I simple cut out letters with my Alphalicous cartridge for my Cricut and embellished the letters with buttons and ribbons and such. So easy and simple but festive and cute! Have a great night!
Here's a close up of the L A N...

and the D R Y!


Monday, June 15, 2009

Card for Daddy

Stacy here......this is post one of three for father's day. My husband loves baseball caps and I love the way this one turned out !! I actually drew out the shape myself (I'm no artist ! lol) and after a few tries, this is what I came up with. Card measures approximately 6x4. The sentiment on the inside simply says "you're the best". Thanks for stopping...have a great night !!


Saturday, June 13, 2009

Fourth of July Buckets

Aaaahhhh, the weekend. My favorite time of the week! It's Becky with you today and I hope you're having nice weather where you are too. Today's project is one I made after seeing centerpieces like this done on various websites. I needed something to add to our table for the Fourth of July bash and these were very easy to do. I had purchased these plain white paint pails, on clearance at Hobby Lobby. On of them was even dented! But once I Mod Podged the paper on, you couldn't even tell! I used Making Memories patterned paper to make two different sized pinwheels and plain card stock in three colors, to coordinate with the patterned paper, to make stars in different sizes. Then glued the pinwheels and stars to painted dowel rods and stuck them in the paint cans where I had placed some floral foam to hold them upright. To cover up the foam, I used that crinkly crunched up paper you use for gift bags. I finished the cans off by adhering letters that spell Celebrate Freedom and some navy grosgrain ribbon on the paper seams. Enjoy and have a great weekend!


Friday, June 12, 2009

Wedding Gift Set

Happy Friday everyone !! Stacy here....it's a little late for me so I apologize if my spelling gets silly !! My husband and I are going to a wedding tomorrow evening for a family member. This picture is not the best, but the colors of the wrapping paper are a pale green and off white. I decided to make a card to match and used some left over wrapping paper on the card and also on the envelope (scalloped circle). I monogrammed their initials on the envelope and embossed the sentiment and monogram. Have a great weekend and thanks for stopping by !!


Thursday, June 11, 2009

Birthday Invitations

Hello there, it's Becky with you today. With today's post I'm starting a trend! A Fourth of July posting frenzy! Our youngest daughter was born on the Fourth of July and we have a big bash every year for her and to celebrate the holiday. I have lots of fun projects to share with you over my next several posts, all Fourth of July themed. I thought I'd start you out easy with the least Fourth of July like project, her birthday invitation! I knew I wanted to make her birthday invites "summery" this year and not so "Fourth of Julyish." So when I picked up the last issue of PaperCrafts magazine and saw the Popsicle card submitted by Betsy Veldman, I knew instantly it would by my inspiration. I fiddled around with my Doodlecharms cartridge for my Cricut until I figured this out:
First I cut two Popsicles with the shadow function at 5 1/2. Then I cut one brown Popsicle at 5 1/2. Then I cut one red Popsicle with the shift function at 5 1/2. I layered all the pieces and scored the bottom white piece along one side. Then I adhered the bottom white piece to the top white piece. I tied orange grosgrain ribbon around the Popsicle and then adhered it to the white card base. To embellish, I cut out the cupcake image on the Doodlecharms cartridge using the charm function and stamped the Celebrate sentiment from PTIs Mixed Messages set. Then I used by circle punch to cut the lime green circles and adhered fun summer epoxy stickers from KI Memories. I attached the charm and embellished circles to the ribbon with white floss.

Here's a group picture of all the Popsicles. What says summer more than a red twin pop? Have a great night!


Wednesday, June 10, 2009

Tea Light Holders

Stacy here !! This will be a quick one......Bunco's tonight and I have to finish feeding the family !! I made these little holders that are perfect for tea lights. I did some research, and decided to use vellum. With the low output from the tea lights, these won't melt away !! I accented with a couple of llittle butterflies and rhinestones to finish them off. The top and bottom are covered with ribbon and the vellum was run through the Cuttlebug and embossed. Have a great night !!


Tuesday, June 9, 2009

Feel Better

Hey guys, Becky with you tonight. I have a get well card to share with you tonight. My inspiration came from two places. First, the color scheme. Last months issue of Country Living, which I don't have a picture of, had this fabulous black and white bedroom with a lime green title. I loved it and knew I wanted to make a card using those colors. The second part of my inspiration came from Dawn McVey and her fabulous distressed flowers! After reading her post, I went downstairs and got to work! I matted a piece of black cardstock, which I ran through my Cuttlebug with my Swiss Dots embossing folder, onto my card base. Then I trimmed a piece of lime green cardstock and punched the edge with my new EK Success punch and stamped my sentiment, from PTI's Mixed Messages, at the bottom. Then I made Dawn's distressed flower and adhered it. This card came together really quick since I knew what colors to use and what my main focal point would be. I hope you have a great night!


Monday, June 8, 2009

Happy Kite

Stacy here : ) Hope everyone had a great weekend !! I thought I'd try my hand at making a kite....tis the season and how cute would it look on a card !! For the kite, I cut out a 2 x 1 3/4 piece of cardstock and scored along my pencil lines. I used a foam sticker on the back to help give it dimension. The card measures 6 x 6 and cardstock is My Mind's Eye. I used a tree stamp from Cornish Heritage Farms and cut it out instead of just using the stamped image. Not bad for my first attempt, but I'm sure I'll be making more as the summer goes along.....thanks for stopping by !!


Saturday, June 6, 2009

Sandpaper Sandcastle

Good Saturday afternoon friends! It's Becky here today with a little gift tag I'm really excited about. Honestly, if you couldn't tell already, it doesn't take much to excite me! Abie has a birthday party today, in about 25 minutes, and I was thinking about the gift tag for the present. I didn't want to do a cupcake again and I thought since it was summer it would be cute to do a sandcastle. Well, it just so happens there's a sandcastle image on the Doodlecharms cartridge for the Cricut. I thought it would be super cute to cut the image out of sandpaper. I also thought it might help sharpen my blade. This was not the case! My blade was pretty old but by using the multi cut function it cut through the sandpaper enough that I was able to pop the image out. I backed it with white cardstock and cut out some seashells from the same cartridge to finish it off. The little girl loves purple so that's why the ribbon doesn't match the card! One more tip, if you cut sandpaper with your Cricut, be prepared to replace your blade when you're done because it kinda tears it up. All in the name of papercrafting right?
Here's an up close picture of the card, you can really see the texture and it really does look like sand!


Friday, June 5, 2009

Mixed Messages

Stacy here : ) Hope everyone had a great week !! Today I thought I'd share a mixed bunch of cards that I made. My plan is to wrap them up with a big bow and give them to my mother-in-law....just because. The paper I used is all from PaperTrey Ink. I love the colors and variety of the paper pack !! The sentiments are also from PTI. Assorted ribbon and there she is !! Have a great weekend !!


Thursday, June 4, 2009

Father's Day #2

Well hello and happy Thursday to you friends! Becky here today with a card I'm so excited about. My struggle with masculine cards just might be getting better. I made this card for my main squeeze for Father's Day. Have you guys seen the grid lines sets from Papertrey and their new grid lines cardstock? Well I have and I would have bought some if I wasn't already buying so much in my last order. So I had the idea for this card and simply made my own grid lines cardstock. I used Papertrey white cardstock and with a ruler and pencil drew very faint lines onto my paper going vertically and horizontally. Then I stamped my grill image, from Hero Arts July set, with Versamagic black ink, and heat embossed with clear powder. Then I stamped my star image, from Papertrey's new Let Freedom Ring set, with Palette Hybrid ink, and heat embossed it with clear powder. Then I erased my pencil marks and was left with this totally awesome, custom patterned paper. So cool! Then I adhered my black grosgrain ribbon and my letters from my Makin' the Grade Cartridge on pop dots. Then I stuck the whole thing to my 5x5 card base. I was pretty excited with the way this card turned out! Hope you have a great day!
Here's an up close look at the card.


Wednesday, June 3, 2009

Message Center

Stacy here !! Hope everyone is enjoying this awesome weather we're having !! I'm so excited about this project that I want to run out and buy more clipboards !! This clipboard has haunted me for months......it's been sitting in my box of items to alter and I just couldn't find to do with it. Well, here it is---my message board !! This is what I did: I painted the clipboard white, it was already white but needed to be brightened up a bit. The cute paper I used was from Pink Paisley. I used my scallop punch on the blue and adhered the circle plaid on top. I printed out calendars to match and attached them with two clothspins that I covered in matching paper and embellished with these cute yarn flowers. On the right there is a post-it note holder at the top and a 3 x 5 white pad below. The pad was secured to the box cover with velcro dots so that I could replace it when needed. Below that is a pen covered in the same matching paper and secured with ribbon. At the bottom is a little cord board that I made out of 6 x 6 squares of cork that I think I got at the Dollar Store and simply cut them in half. To finish it up I hot glued buttons onto the thumbtacks and Viola !! My own little message center !! This one is going to sit on my recipe stand. Thanks for looking and have a great day !!


Tuesday, June 2, 2009

Father's Day #1

Hey all, Becky here with you tonight! Two things, first, I have a problem. It's not one I like to discuss in mixed company, but I'm willing to open up here, on our blog. Are you ready? Here goes...I can't make masculine cards. There, I said it. Whew, that feels good to get it off my chest! I've been putting off working on my Father's Day cards because I have such a hard time with them. So the card I'm sharing tonight is for my dad. He's a Harley guy, as is my husband, and I have had this paper for quite some time from EK Success. The paper is a 12x12 sheet with silver flames and a bar and shield with wings down in the lower right hand corner. So I trimmed the paper to fit on my black card base with the bar and shield showing. Which brings me to the second issue. Plain and simple. Have you ever made a card that is soooooo plain and simple that you worry there's not enough on it? That was my problem with this card. After adhering the patterned paper with pop dots, I couldn't figure out what else to put on it. I thought it looked okay. Very simple but it's for my dad, who's a simple guy. So, I just trimmed some white cardstock for the inside of the card and wrote "Happy Father's Day" and called it a night! Hope you have better luck with masculine cards than I!
Here's a close up picture of my simple card!


Monday, June 1, 2009

Birthday Card for Grandma

Stacy here---It's Monday again and so far the hottest day of the year !! We just returned from visiting my grandma out of state and she loved her card and gifts !! It seems that my favorite card size is 5x5, as this one is !! I embossed Happy Birthday.......I love to emboss !! So far, the only color of embossing powder I've bought is clear. I have been able to use all of my ink pads to emboss in a rainbow of colors !! I added a cute little butterfly to keep it simple and clean. Have a great week !!